
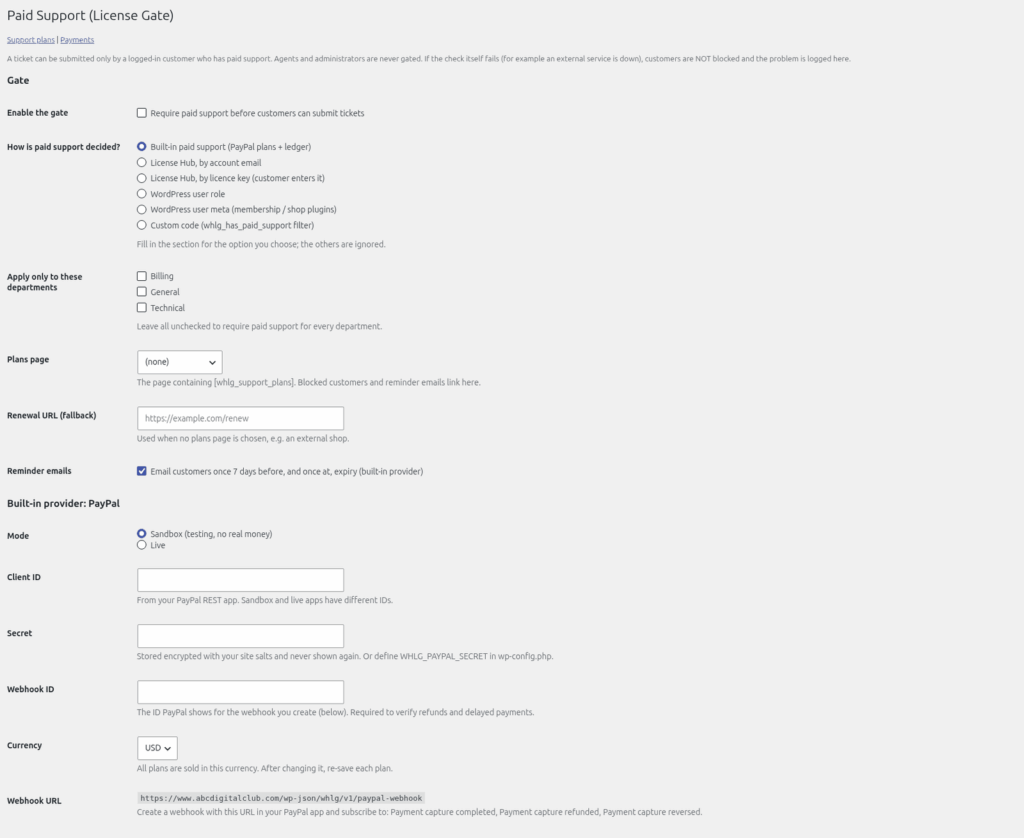
The Paid Support (License Gate) extension lets you charge for support, or limit support to customers who qualify. From here on we call it Paid Support. It adds three items under the Paid Support group of the Helpdesk menu: "Paid Support", "Support plans" and "Payments". On the Plugins screen it is listed as WP Helpdesk – License Gate.
How the gate works
- The gate is off until you tick "Enable the gate".
- Administrators and agents are never gated. Guests are asked to log in.
- You can limit the gate to certain departments with "Apply only to these departments".
- If the gate cannot check someone (for example PayPal or your licence service is down), the customer is allowed through rather than shut out. The error shows on the settings screen.
Choose how paid support is decided
Under "How is paid support decided?" choose one:
- "Built-in paid support (PayPal plans + ledger)". This is the default and is covered below.
- "License Hub, by account email". Fields: "License Hub URL", "Product slug", "Hub API token" and "Block when support has expired". The customer is looked up by their WordPress account email. They do not type a key.
- "WordPress user role". Set "Roles that count as paid".
- "WordPress user meta (membership / shop plugins)". Set "Meta key", "Expected value (optional)" and "Expiry meta key (optional)".
- "Custom code (whlg_has_paid_support filter)", for developers.
"Test provider" checks the option you chose.
Sell plans with PayPal
Paid Support is configured with your own PayPal credentials. Test everything in PayPal's sandbox first, with no real payments, before you go live.
- Create a REST app at developer.paypal.com and copy its Client ID and Secret.
- Go to Helpdesk > Paid Support, section "Built-in provider: PayPal". Set "Mode" to "Sandbox (testing, no real money)". Sandbox is the default, and we recommend testing your whole payment flow in Sandbox before switching to Live.
- Paste the "Client ID" and "Secret" (the secret is stored encrypted). Choose a "Currency" (default USD). Every plan is sold in this one currency.
- Click "Test PayPal connection". It asks PayPal for a token without taking a payment.
- In your PayPal app, create a webhook using the "Webhook URL" shown on the page. Subscribe it to exactly "Payment capture completed", "Payment capture refunded" and "Payment capture reversed". Paste the webhook's ID into "Webhook ID". PayPal webhooks are needed for refunds and delayed payments.
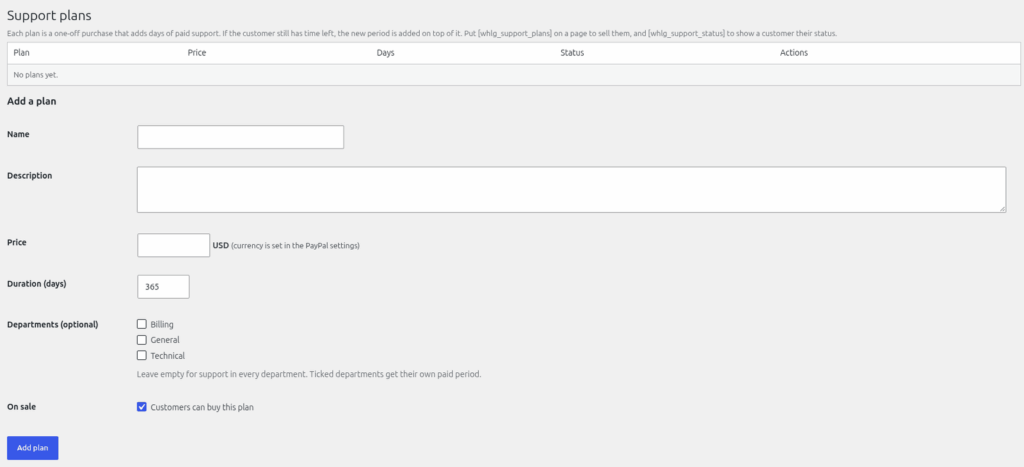
- Go to Helpdesk > Support plans and add plans: "Name", "Description", "Price", "Duration (days)", optional "Departments (optional)" and "On sale". You can have up to 10 plans.
- Create a page containing and choose it as the "Plans page". Customers pay with PayPal's buttons on this page. Optionally add
Please log in to buy a support plan.
to show "Paid support active until…" and a renew button.Please log in to buy a support plan.
- Make a test purchase with a sandbox buyer account, then refund it in the PayPal sandbox and check the ledger shows the refund. When the whole flow works, follow "Going live with real payments" below.
Going live with real payments
Sandbox is for practice. Live is where customers pay you for real. Take a few minutes over the switch, because from the moment Live is on, every plan purchase is a real PayPal payment.
What changes when Live is on
- In Sandbox, Paid Support uses your PayPal sandbox keys and takes no real payments. Only sandbox buyer accounts can "pay".
- In Live, customers are charged real payments, in the "Currency" you chose, for the plans on your Plans page. The cash goes to your PayPal account.
- Paid support is tied to the customer's WordPress account. Once they have bought a plan, they can open tickets until it expires. If you tick "Enable the gate", customers without active paid support can no longer open tickets in the gated departments.
- Refunds, reversals and delayed payments reach your site through the live webhook, so the "Webhook ID" matters. In Live mode with no Webhook ID, the page shows a warning.
Switch from sandbox keys to live keys
Sandbox and live keys are different: as the settings page says, "Sandbox and live apps have different IDs." Paid Support keeps a separate set of "Client ID", "Secret" and "Webhook ID" for each mode. The fields have the same labels in both modes, but when you switch "Mode" to "Live" you enter your live set, and your sandbox set stays saved for later.
To go live with PayPal you need a verified PayPal Business account.
- Log in to the PayPal Developer dashboard (developer.paypal.com) with your PayPal Business account and open Apps & Credentials.
- Switch the Sandbox/Live toggle to Live. Open your app in the REST API apps section, or select Create App, and copy its live Client ID and Secret.
- In the same live app, add a webhook. Live apps need their own webhook: the sandbox one does not carry over. Use the "Webhook URL" shown on the Paid Support page, which is your-site/wp-json/whlg/v1/paypal-webhook (for example https://www.abcdigitalclub.com/wp-json/whlg/v1/paypal-webhook). Subscribe it to "Payment capture completed", "Payment capture refunded" and "Payment capture reversed", as the settings page explains under the Webhook URL. Copy the webhook's ID.
- Go to Helpdesk > Paid Support, section "Built-in provider: PayPal", and change "Mode" to "Live".
- Enter the live "Client ID", "Secret" and "Webhook ID", then click "Save Changes". The Secret is stored encrypted and never shown again. If you prefer, you can define WHLG_PAYPAL_SECRET in wp-config.php instead.
- Click "Test PayPal connection". It uses the saved settings and requests a token from PayPal, so no payment is made.
- Tick "Enable the gate" when you are ready for it to apply.
Pre-launch checklist
- A full sandbox test is done: a purchase, the "support granted" email, a refund, and the ledger showing each step. We recommend this before every first switch to Live.
- Live Client ID, Secret and Webhook ID are entered, "Mode" reads "Live", and "Test PayPal connection" passes with no webhook warning.
- Plans and prices are checked under Helpdesk > Support plans: names, descriptions, "Price", "Duration (days)", departments, and that only the plans you want are "On sale". Check the "Currency" too.
- The Plans page is published and set as the "Plans page", and "Apply only to these departments" covers the right departments.
- Make one small real test payment with your own PayPal account (a cheap plan works well), check it appears under Helpdesk > Payments, then refund it in PayPal and check it shows as "refunded" and the support days are taken back.
What customers see
- On your Plans page, logged-in customers see the plans on sale and pay with PayPal's buttons. Guests are asked to log in first.
- After paying, they get an email when support is granted. A page with the status shortcode shows "Paid support active until…" and a renew button.
- With "Reminder emails" on, they get one email 7 days before expiry and one at expiry.
- Administrators and agents never see the gate.
- The Plans page looks exactly the same in Live as it did in Sandbox. The only difference is that payments are now real.
Switching back to Sandbox
If something looks wrong after going live, change "Mode" back to "Sandbox (testing, no real money)" and save. Your saved sandbox keys are used again, and real payments stop at once. If you would rather not block customers while you fix things, untick "Enable the gate" too. Switching back does not undo anything: support already granted from live payments stays in place, and every payment stays recorded under Helpdesk > Payments. Refunds for live payments are still made in PayPal.
Keep your live keys secret
Your live Client ID, Secret and Webhook ID give access to real payments. Treat the Secret like a password: never share it in a ticket, email or chat, never commit it to code, and blur it (or show empty fields) in any screenshot or screen recording. If a live Secret is ever exposed, create a new one in PayPal straight away and paste it into Paid Support.
Payments, refunds and reminders
- A new purchase is added on top of any time still left.
- Customers get an email when support is granted. With "Reminder emails" on, they get one 7 days before expiry and one at expiry.
- HelpDesk WP does not issue refunds. Refund the payment in PayPal. The webhook then marks it "refunded" or "reversed", takes the support days back and alerts you by email. A partial refund is only noted; support is not changed.
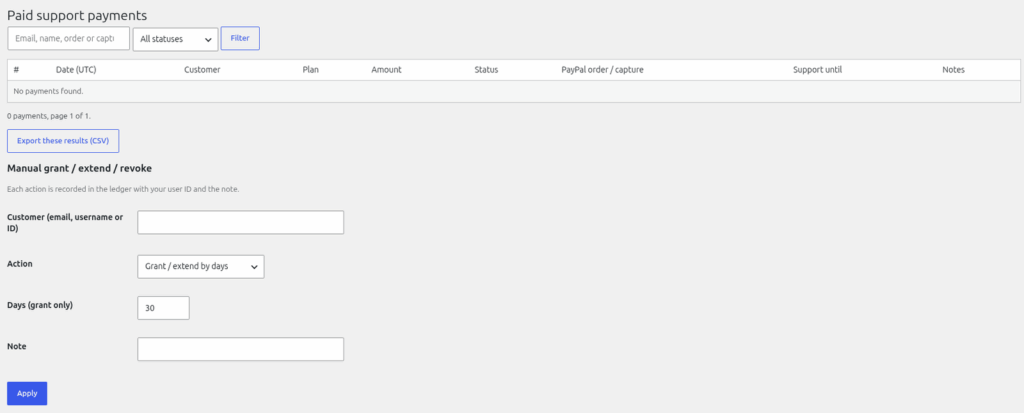
- Helpdesk > Payments lists payments with a search, a status filter and "Export these results (CSV)". "Manual grant / extend / revoke" lets you add days ("Grant / extend by days") or end paid support ("Revoke all paid support now").
- Payments are personal data. The export and erase tools anonymise the name, email and notes but keep amounts and PayPal transaction IDs.
- "Delete data on uninstall" is off by default.
Still stuck? Open a ticket on the support page on ABC and a real person will help.
Was this article helpful?